How TO ALIGN YOUR ISLAND HOUSE™ TEMPLATE TO A NEEDLEPOINT CANVAS
WRITTEN BY: JOANN GARDELLA

ALIGNING YOUR IHN TEMPLATES WITH MONO CANVAS
Island House™ Background templates are essential tools for needlepointers looking to create perfectly shaped finished pieces. Our templates include circles, squares, rectangles, ovals, and grommet tag shapes, each featuring etched lines indicating the center of the horizontal and vertical axes. By aligning these lines with canvas threads or holes, you can ensure that your stitched area represents the desired shape for your finished needlepoint piece.
Aligning Your Template:
To align your template correctly, you’ll need to determine the number of stitches required to achieve your desired dimensions based on the canvas mesh size. Use the chart below to find the appropriate number of stitches for your project.
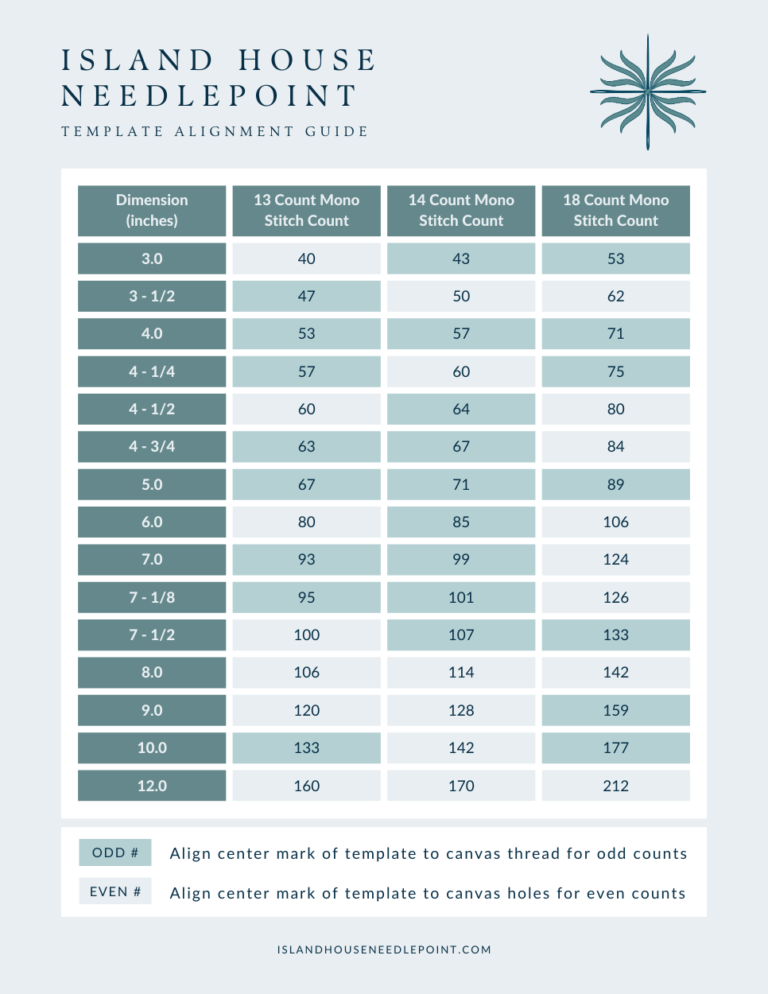
If the required number of stitches is odd, align the template line with a canvas thread. If the number of stitches is even, align the template line along the canvas holes. This rule applies to both vertical and horizontal alignment.
Example:
To stitch an oval that is 3.5″ wide by 7.5″ tall on 18 mesh canvas, consult the table to find that you’ll need 62 stitches wide x 133 stitches tall. Align the vertical line on the template (controlling the 3.5″ width) with canvas holes and the horizontal line (controlling the canvas height) with a canvas thread.
Marking Your Canvas:
Once your background template is aligned, use a permanent marker or pen to draw around the outside of the template. Remember that the template should just cover the stitches. Follow the rule that if the ink is on a canvas thread, stitch the stitch.
Tips for Choosing the Right Marker:
- Use Micron archival ink pens, which come in various colors. Choose a color that closely matches your fiber to prevent see-through, especially when using open stitches or light-colored threads.
- Avoid using pencils, as the graphite can be pulled into your stitches during the finishing process.
- Non-permanent pen marks may bleed if your canvas is exposed to moisture, such as humidity or blocking.
By following these simple steps and using Island House™ Background templates, you can ensure that your needlepoint projects turn out perfectly shaped every time. Happy stitching!
Thank you for reading and following along! Please feel free to contact me with any questions or comments at JoAnn@IslandHouseNeedlepoint.com or on Instagram @Islandhouseneedlepoint.